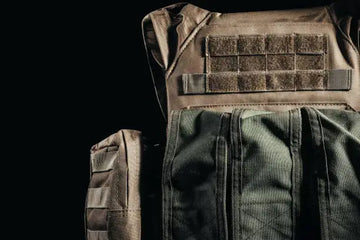
A well-configured plate carrier boosts comfort, mobility, and effectiveness in tactical scenarios, whether for military, law enforcement, or civilian use.
This guide simplifies the process of setting up your plate carrier, focusing on practical steps to balance protection, accessibility, and ease of use. We’ll cover gear placement, role-specific configurations, and tips to optimize your setup without clutter.
Core Setup Principles
To create an effective plate carrier setup, prioritize these principles:
-
Protection: Position armor plates to shield vital organs without limiting movement.
-
Accessibility: Place essential gear where you can reach it quickly, especially with your dominant hand.
-
Balance: Distribute weight evenly to reduce fatigue.
-
Comfort: Adjust fit and add padding for long-term wear.
- Adaptability: Tailor your setup to your mission or environment.
Regular testing through movement and drills ensures your setup performs under pressure.
1. Position Your Armor Plates
Proper plate placement is critical for safety and mobility.
-
Front Plate: Align the top with your sternal notch (the dip at the base of your neck) and the bottom to cover your upper abdomen. This protects your heart and lungs.
-
Back Plate: Set it to cover your shoulder blades for spinal protection.
- Fit: Ensure plates fit snugly in the carrier. Opt for multi-curve plates for better ergonomics.
Choose plates based on your needs:
Level III: Lightweight for mobility, suitable for civilians or low-threat scenarios.
Level IV: Maximum protection for high-threat environments, ideal for military or SWAT.
Check the manufacturer's specifications to confirm plate compatibility with your carrier.
2. Organize Your Gear
Arrange gear for quick access and functionality, keeping the setup streamlined.
Front: High-Priority Items
The front panel is for the gear you need immediately.
-
Magazines: Secure 2–4 magazines in the center for fast reloads. Retention systems, like those from Magpul, ensure reliability.
-
Communication: Place a radio on the side to avoid cluttering the center. Keep antennas clear of movement.
- Secondary Items: If using a pistol, position 1–2 pistol magazines on the outer edge. A small general-purpose pocket can hold maps or gloves.
Sides: Support Gear
Side panels hold items used less frequently but still critical.
-
Medical Kit: Equip an IFAK with a tourniquet, bandages, and chest seals. Position it for access with either hand. Compact kits from North American Rescue are effective.
-
Utility Items: Store tools, extra ammo, or mission-specific gear on the opposite side for balance.
- Specialized Gear: For missions requiring grenades (e.g., smoke or flashbangs), secure them here to keep the front clear.
Back: Sustained Operations
The back panel is for items that support longer missions.
-
Hydration: A 2–3-liter hydration bladder provides water without hand use. Choose insulated options for temperature control.
-
Extra Storage: A detachable bag or assault pack can hold clothing or additional supplies. Ensure it has quick-release features.
- Mission Tools: For breaching roles, secure tools like bolt cutters in a holder for easy access.

3. Setup for Different Situations
Different situations call for different plate carrier configurations to get the most out of them and be able to adapt. Here are the most common plate carrier use cases, including military, SWAT, law enforcement, and civilians.
a. High-Mobility Operations
Who It’s For: Military infantry (e.g., Army soldiers, Marines), law enforcement on rapid-response duties, or civilians needing agility (e.g., home defense).
Environment: Short-duration missions, urban settings, or scenarios prioritizing speed and mobility.
Setup:
Plates: Level III or III+ plates (lightweight, ~3–5 lbs, polyethylene or ceramic) for mobility.
Gear:
2–3 magazines with secure retention (e.g., elastic or kydex).
Compact IFAK (tourniquet, bandages, chest seals).
Single radio for communication.
1.5–2-liter hydration bladder.
Optional: flashlight or multi-tool for utility.
Placement:
Front: Magazines and radio.
Side: IFAK and multi-tool.
Back: Hydration bladder.
b. High-Threat Tactical Missions
Who It’s For: Military special operations (e.g., Army Rangers, Navy SEALs), SWAT teams, or tactical law enforcement in high-risk scenarios.
Environment: Prolonged, high-threat operations (e.g., counter-terrorism, hostage rescue, urban combat).
Setup:
Plates: Level IV plates (standalone, ~6–8 lbs, NIJ-certified) with anti-spall coating for maximum protection against rifle rounds.
Gear:
4–6 magazines for sustained engagements.
Advanced IFAK (decompression needles, clotting agents, airway tools).
Dual radios for redundant communication.
Breaching tools (e.g., bolt cutters) and grenades (flashbangs, smoke).
3-liter hydration bladder.
Optional: body camera (for SWAT) or handcuffs (law enforcement).
Placement:
Front: Magazines, primary radio, small pocket for grenades.
Side: IFAK, breaching tools, secondary radio.
Back: Hydration bladder, detachable pack for extra ammo.
c. Civilian Preparedness
Who It’s For: Civilians preparing for home defense, emergency response, or personal security.
Environment: Low-to-moderate threat scenarios (e.g., home invasions, natural disasters).
Setup:
Plates: Level III plates (~3–5 lbs) for balanced protection and weight.
Gear:
2–3 magazines with simple retention for self-defense.
Basic IFAK (bandages, tourniquet, antiseptic wipes).
Phone holder or small radio for emergency communication.
Flashlight (rechargeable, multi-setting).
Multi-tool and spare ammo in a small pouch.
Placement:
Front: Magazines, phone/radio.
Side: IFAK, flashlight.
Back: Small pack for extras (e.g., water bottle, spare ammo).
4. Optimize for Performance
Balance Weight
Uneven weight causes fatigue. To avoid this, ensure your load is evenly distributed. Check that your magazines, pouches, and other gear don't pull your carrier to one side.
Quick-Release Features
Consider adding quick-release buckles for emergencies, like shedding the carrier in water.
Prioritize Comfort
-
Fit: Adjust shoulder straps and cummerbund for a snug, breathable fit.
-
Padding: Add padded shoulder covers or a cummerbund for long missions. Brands like Crye Precision offer ergonomic options.
- Ventilation: Choose carriers with mesh linings to reduce heat.
Additional Tips
- Dominant Hand: Position the critical gear for your dominant hand.
- Color Coding: Use colors (e.g., red for medical) to identify items quickly.
- Gear Check: Before any mission, double-check that all pouches are secure, zippers are closed, and nothing is loose.
- Training: Practice drawing magazines, using medical gear, and moving with your loadout. The more familiar you are with your setup, the more efficient you'll be in real situations.
5. Test and Refine Your Setup
Once you have everything in place, test your plate carrier in realistic conditions—run, crouch, and access gear.
Adjust placement or remove non-essential items to improve efficiency. Regular practice keeps your setup reliable as your needs evolve.
Check out our plate carrier collection
Conclusion
A well-planned plate carrier setup enhances protection, accessibility, and comfort. By positioning armor plates correctly, organizing gear thoughtfully, and tailoring to your role, you'll be well-prepared for any situation.
FAQs
Q: How many magazines should I carry on a plate carrier?
A: 2–6, depending on mission length and threat level. Civilians typically need 2–3.
Q: How Far Down Should a Plate Carrier Be?
A: The front plate should start at the sternal notch and cover the upper abdomen, protecting vital organs without limiting mobility.
Q: What level of armor plates should I choose?
A: Level III plates (~3–5 lbs) offer lightweight protection against common rifle rounds, ideal for civilians or mobile operations. Level IV plates (~6–8 lbs) protect against armor-piercing rounds, suited for high-threat missions like SWAT or military operations.
Q: Where should I place my IFAK for quick access?
A: Position your IFAK on the side panel for ambidextrous access with either hand. Ensure it includes essentials like a tourniquet, bandages, and chest seals.
Q: How do I ensure my plate carrier is comfortable for long missions?
A: Adjust shoulder straps and cummerbund for a snug fit, add padded inserts, and choose a carrier with mesh lining for ventilation. Test the setup during movement to avoid chafing.
Q: Can civilians legally use plate carriers for self-defense?
A: Yes, civilians can legally own and use plate carriers in most regions, but check local laws (e.g., restrictions on body armor in some U.S. states like Connecticut). They’re popular for home defense and emergency preparedness.
Q: How do I balance weight to avoid fatigue?
A: Distribute gear evenly across front, side, and back panels. For example, pair an IFAK on one side with a utility pouch on the other. Test by running or climbing to ensure stability.
